

Introduction
Setting up WordPress locally has traditionally been a complex task. Developers and website creators often struggle with installing Apache, PHP, MySQL, and configuring them all to work together. But what if there was a simpler way?
Enter Docker.
Docker is a containerization technology that packages applications and their dependencies into isolated, portable units called containers. Instead of installing WordPress, Apache, and MySQL on your machine, you can run them in containers—isolated environments that work the same everywhere.
In this comprehensive guide, we’ll walk through setting up a complete WordPress development environment using Docker Compose on macOS. By the end, you’ll have a fully functional WordPress site running locally, ready for development and testing.
What is Docker? Understanding the Basics
The Problem Docker Solves
Imagine you’re building a WordPress site on your machine. You need:
- Apache or Nginx (web server)
- PHP (programming language)
- MySQL (database)
- Various PHP extensions
- Configuration files for each component
After installation, you might face issues like:
- Version conflicts (you need PHP 8.1, but another project needs PHP 7.4)
- Missing dependencies
- Configuration differences between your laptop and production server
- Difficult setup for new team members
How Docker Solves It
Docker packages each application component into a container—a standardized, isolated box containing:
- The application (MySQL, WordPress, etc.)
- All dependencies (libraries, extensions)
- Configuration files
- Everything needed to run
Think of containers like shipping containers:
- Standardized size and format
- Can be transported anywhere
- Always contain the same contents
- Don’t interact with each other (isolated)
Key Docker Concepts
- Image: A blueprint for a container. Think of it as a recipe that describes how to build a container. Images are downloaded from Docker Hub (a repository of images).
- Container: A running instance of an image. Like a virtual machine, but much lighter weight. Containers share the host OS kernel, making them fast and efficient.
- Volume: Persistent storage. Even when a container stops, volumes preserve data. Essential for databases and files.
- Network: Allows containers to communicate with each other. Without networks, containers can’t talk to one another.
Why Use Docker for WordPress Development?
Benefits of Docker for WordPress Development
Consistency Across Environments
- Your local development environment matches production
- “It works on my machine” problems disappear
- Team members have identical setups
Isolation
- Multiple projects can run different PHP versions simultaneously
- No conflicts between projects
- Changes to one project don’t affect others
Easy Setup for New Developers
- No complex installation guides
- New team member runs: `docker compose up -d` and everything works immediately
Lightweight and Fast
- Containers start in seconds (vs minutes for virtual machines)
- Use minimal resources
- Run many containers simultaneously
Production-Ready
- Same setup locally and on production servers
- Easier deployment pipeline
- Better testing before going live
Easy Cleanup
- Delete containers and everything disappears
- No leftover files or configurations
- Start fresh instantly
Real-World Example
Without Docker: Installation steps
Time: 5-7 hours | Risk: Configuration errors | Difficulty: Medium-Hard
- Install Homebrew
- Install Apache
brew install apache2- Install PHP
brew install php@8.1- Configure Apache for PHP
- Install MySQL
brew install mysql- Configure MySQL
- Download WordPress
- Configure WordPress
- Set up database
- Test everything
With Docker: Installation steps
Time: 1-2 hours | Risk: Minimal | Difficulty: Easy
- Install Docker Desktop
- Create docker-compose.yaml file
- Run
docker compose up -d- Access WordPress at
http:///localhost
Prerequisites and Installation
What You’ll Need
Hardware Requirements
- macOS (Intel or Apple Silicon)
- 4GB RAM minimum
- 10GB free disk space for Docker images and data
- Stable internet connection
Software Requirements:
- Docker Desktop for Mac
- Terminal/Command Line access
- Text editor (VS Code etc.)
- Web browser
Step-by-Step Setup Guide
Step 1: Verify Docker Installation
Before proceeding, ensure Docker is properly installed and running.
Open Terminal and run
docker --versionExpected output
Docker version 24.0.0 (or higher), build xxxxxVerify Docker Compose
docker compose versionExpected Output
Docker Compose version v2.17.0 (or higher)Step 2: Create Project Directory
Create a folder where your WordPress project will live.
In Terminal
# Create directory
mkdir -p ~/Desktop/wordpress-local

# Navigate into it
cd ~/Desktop/wordpress-local

# Verify you're in the right place
pwd
Step 3: Create the docker-compose.yaml File
This file defines your entire WordPress environment.
Create the file
# Open text editor (nano is simple)
nano docker-compose.yaml
Copy and paste this content
name: devopsgeeks-wordpress

networks:
  wordpress_network:
    driver: bridge
    name: wordpress_network

volumes:
  wordpress_data:
    driver: local
  mysql_data:
    driver: local

services:
  mysql:
    image: mysql:latest
    container_name: mysql
    restart: always
    networks:
      - wordpress_network
    environment:
      MYSQL_ROOT_PASSWORD: ${DB_ROOT_PASSWORD}
      MYSQL_DATABASE: ${DB_NAME}
      MYSQL_USER: ${DB_USER}
      MYSQL_PASSWORD: ${DB_PASSWORD}
    volumes:
      - ./mysql_data:/var/lib/mysql
    ports:
      - "3307:3306"
    healthcheck:
      test: ["CMD", "mysqladmin", "ping", "-h", "localhost", "-u${DB_USER}", "-p${DB_PASSWORD}"]
      interval: 10s
      timeout: 5s
      retries: 5
      start_period: 20s

  wordpress:
    image: wordpress:latest
    container_name: wordpress
    restart: always
    networks:
      - wordpress_network
    environment:
      WORDPRESS_DB_HOST: mysql:3306
      WORDPRESS_DB_NAME: ${DB_NAME}
      WORDPRESS_DB_USER: ${DB_USER}
      WORDPRESS_DB_PASSWORD: ${DB_PASSWORD}
      WORDPRESS_TABLE_PREFIX: wp_
    volumes:
      - ./wordpress_data:/var/www/html
    ports:
      - "80:80"
    depends_on:
      mysql:
        condition: service_healthy
Step 4: Create the .env File
The .env file contains sensitive configuration (passwords and usernames). It’s separate from docker-compose.yaml for security.
Create .env file:
nano .envCopy and paste:
# Database Configuration
DB_ROOT_PASSWORD=rootpassword123
DB_NAME=wordpress_db
DB_USER=wordpress_user
DB_PASSWORD=wordpress_secure_password
Security Note:
- Never commit .env to Git
- Change passwords for production
- Keep this file safe
Step 6: Start Docker Containers
Now the magic happens. One command brings up your entire WordPress environment.
In Terminal:
docker compose up -dWhat this command does:
- docker compose: Use Docker Compose
- up: Start the services
- -d: Detached mode (runs in background)
Expected output:
[+] Running 2/2
 ✔ Network wordpress_network  Created
 ✔ Container mysql               Started
 ✔ Container wordpress           Started
What’s happening behind the scenes:
Docker Daemon
    ↓
Creates network "wordpress_network"
    ↓
Pulls MySQL image (first time only)
    ↓
Starts MySQL container
    ↓
MySQL initializes database
    ↓
Pulls WordPress image (first time only)
    ↓
Waits for MySQL to be healthy (20-30 seconds)
    ↓
Starts WordPress container
    ↓
Both services running!
Step 7: Check Container Status
Verify that both containers are running properly.
Check status:
docker compose psExpected output:
NAME          IMAGE                STATUS                  PORTS
mysql         mysql:latest         Up 30s (health: starting)  0.0.0.0:3307->3306/tcp
wordpress     wordpress:latest     Up 20s                     0.0.0.0:80->80/tcp
If you see different status:
- Exited (1): Container crashed
- Solution: docker compose logs to see error
- health: unhealthy: Healthcheck failed
- Solution: Wait 30 seconds and check again
Wait for MySQL to be healthy:
It typically takes 20-30 seconds. Keep checking:
# Keep running this until MySQL shows (healthy)
docker compose ps mysql

# When you see:
# mysql    mysql:latest    Up 35s (healthy)
# Then WordPress can connect
or as you have docker desktop installed so it can be checked there as well,

Step 8: Access WordPress
Once containers are running, access your WordPress site.
In your web browser:
- Open your browser
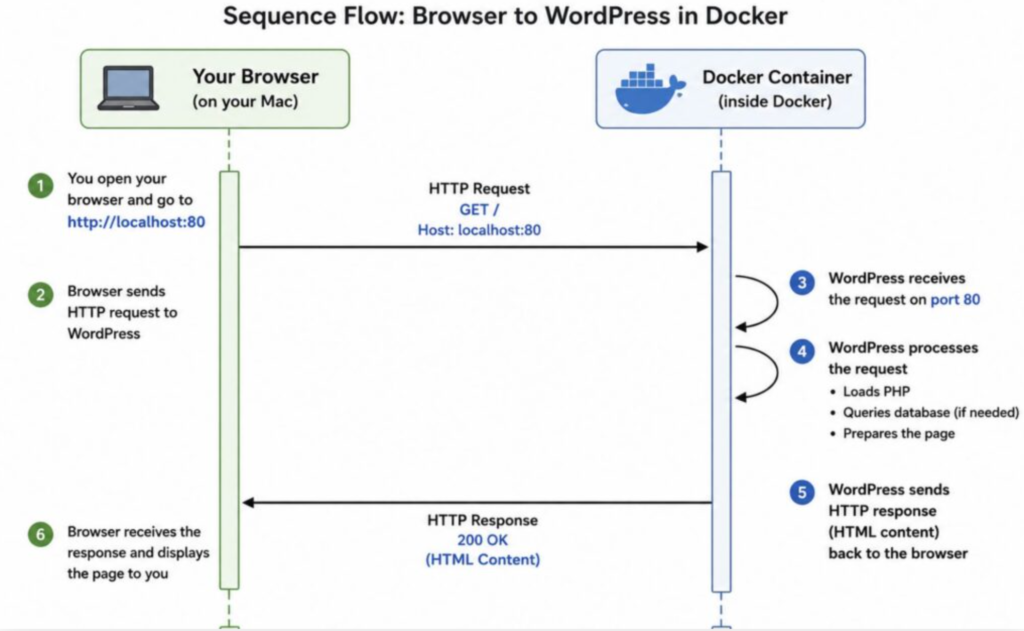
- Go to: http://localhost
- You should see WordPress installation screen. Bingo! 🙂
- You’re now in WordPress dashboard
- Your local WordPress is fully set up!
If nothing appears:
- Wait another 30 seconds (WordPress might still be starting)
- Hard refresh: Cmd+Shift+R (clear browser cache)
- Check logs
docker compose logs wordpressUnderstanding Docker Compose
What is Docker Compose?
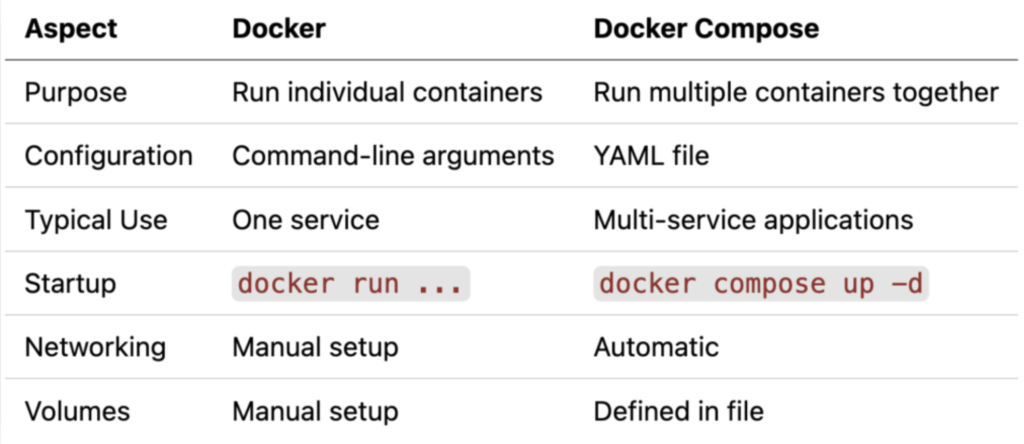
Docker Compose is a tool for defining and running multiple containers as a single application. Instead of running commands for each container separately, you write a configuration file that describes your entire application.
Docker Compose vs. Docker
The docker-compose.yaml File
This file is the blueprint for your entire WordPress environment. Let’s break it down:
name: devopsgeeks-wordpress
# Project name - all containers prefixed with this
Networks Section
networks:
  wordpress_network:
    driver: bridge
    name: wordpress_network
This creates an isolated network where containers can communicate. Think of it as an internal network card:
- Containers on this network can reach each other using hostnames
- Example: WordPress can reach MySQL using the name mysql
- DNS resolution happens automatically
Volumes Section
volumes:
  wordpress_data:
    driver: local
  mysql_data:
    driver: local
Volumes are persistent storage. Imagine two scenarios:
Without volumes:
Container stops → All data deleted → Disaster!With volumes:
Container stops → Data persists in volume → Container restarts → Data still there- wordpress_data: Stores WordPress files, plugins, themes
- mysql_data: Stores database files
The Services Section
Services are the containers that make up your application:
services:
  mysql:           # Service name
    image: ...     # Which image to use
    environment:   # Configuration (environment variables)
    volumes:       # Storage
    ports:         # Public ports
    ...

  wordpress:
    image: ...
    ...
How it All Works Together
Now that WordPress is running, let’s understand the architecture and how components interact.
The Complete Architecture

How WordPress Connects to MySQL
The Challenge: WordPress needs to connect to MySQL. But they’re in different containers. How do they find each other? The Solution: Docker DNS . Docker has built-in DNS that maps container names to IP addresses.
WordPress Container attempts connection to: "mysql:3306"
                    ↓
Docker DNS lookup: "Who is mysql?"
                    ↓
Docker checks wordpress_network
                    ↓
Finds container named "mysql"
                    ↓
Gets its internal IP (e.g., 172.18.0.2)
                    ↓
WordPress connects to 172.18.0.2:3306
                    ↓
Success! Connected to MySQL
In docker-compose.yaml:
environment:
  WORDPRESS_DB_HOST: mysql:3306  # "mysql" is resolved via Docker DNS
This is why the hostname is just mysql, not an IP address.
Volume Persistence Explained
Scenario 1: Without Volumes
Container running
    ↓
Database stored in container memory
    ↓
Container stops → All data gone
    ↓
Start new container → Data lost forever
    ↓
Disaster!
Scenario 2: With Volumes (What We Use)
Container running
    ↓
Database stored in volume (./mysql_data/)
    ↓
Volume is on host computer (your Mac)
    ↓
Container stops → Data remains in ./mysql_data/
    ↓
Start new container → Reads from ./mysql_data/
    ↓
Data persists!
In our setup:
volumes:
  - ./mysql_data:/var/lib/mysql
  └──────┬──────┘ └───────┬─────┘
         │                │
    On your Mac      Inside container (/var/lib/mysql)
(/Users/<YOU>/wordpress-local)
Port Mapping Explained
What are Ports? Ports are like apartment numbers on a building. Traffic comes through different ports.
- Port 80: HTTP web traffic
- Port 443: HTTPS encrypted traffic
- Port 3306: MySQL database traffic
- Port 80, 443, 3306, etc.: Standardized port numbers
The Startup Sequence
What happens when you run docker compose up -d
Time: T+0
├─ Docker reads docker-compose.yaml
├─ Docker reads .env file
└─ Variables substituted (${DB_PASSWORD} → actual password)

Time: T+1-2
├─ Docker creates network "wordpress_network"
└─ Docker creates volumes (directories for storage)

Time: T+3-5
├─ Docker downloads MySQL image (if not exists)
└─ Docker starts MySQL container

Time: T+5-10
├─ MySQL initializes
├─ Creates database "wordpress_db"
├─ Creates user "wordpress_user"
└─ Starts listening on port 3306

Time: T+10-20
├─ Docker performs healthcheck
├─ Runs: mysqladmin ping
├─ Waits for response (tests every 10 seconds)
└─ Marks MySQL as "healthy"

Time: T+20-25
├─ WordPress waits for: mysql:condition:service_healthy
├─ Sees MySQL is healthy
└─ Starts WordPress container

Time: T+25-35
├─ Docker downloads WordPress image (if not exists)
├─ Docker starts WordPress container
├─ Apache starts
├─ PHP starts
└─ WordPress is ready for connections

Time: T+35+
└─ Everything running! Ready for browser access
Quick Reference
Most Used Commands
| Task | Command |
|---|---|
| Start WordPress | docker compose up -d |
| Stop WordPress | docker compose stop |
| View Status | docker compose ps |
| View Logs | docker compose logs -f |
| Access MySQL | docker compose exec mysql mysql -u wordpress_user -p |
| Access WordPress Shell | docker compose exec wordpress bash |
| Backup Database | docker compose exec mysql mysqldump -u wordpress_user -p wordpress_db > backup.sql |
| Restart | docker compose restart |
| Remove Everything | docker compose down -v |